6 simple stitches

Starting an embroidery piece can be overwhelming no matter how long you have been stitching. There are many things to consider: is my fabric good enough? What colours will I use? And what exactly do I want to stitch?! These are all things you can experiment with, but one of the things that will really make your embroidery successful is your use of stitches. There are hundreds of different stitches that you can use to embellish a project. I want to show you six of my favourite simple stitches that are extremely versatile.
These stitches can be used to create an outline or even fill a whole piece. The stitches below can be adapted to suit your needs by either making your stitches smaller or longer to achieve different effects.
Here is a sampler of what they will look like when complete. Note that I am only using 2 threads for the stitches. (If you are working with DMC threads, the skein is compiled of 6 individual strands that you can gently separate to get your desired thread density.) If you want to make something bigger, simply add more threads. If you are working with really fine details, you might want to strip it back to one.

I have drawn out guides to help you get started on your very own project.
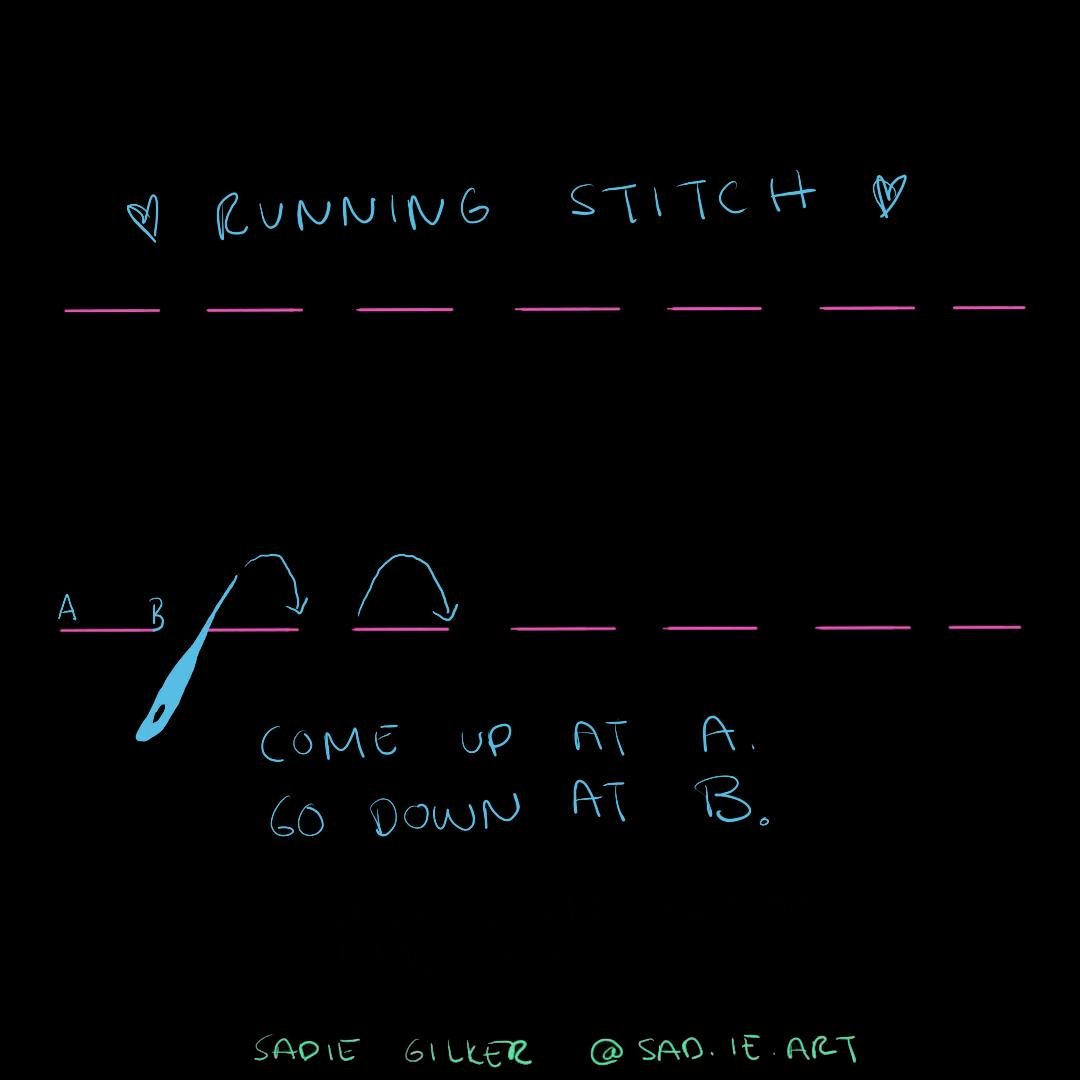
1. Running Stitch.
This is a great stitch to create basic shapes, and I use it often to create lines along borders. This is your most basic stitch, and if you have ever experimented with hand-sewing a garment, this is likely the stitch you used.
Begin by coming up at point A.
Bring your needle over to your desired stitch length. On my sampler I made my stitches roughly 0.5 cm in length.
Pull your needle down through point B.
Move your needle over a bit to the side and create a new point A.
Repeat this until you have completed your stitch.

2. Back Stitch
While this stitch looks similar to the running stitch, it creates a complete and solid line. This is my go-to stitch for most of my outlines because it is really easy to work, and it makes really lovely curved lines when you work the stitches a bit smaller.
Come up at point A.
Go down at point B, which is behind point A.
Move your needle to the right, and come up at point C.
To finish the line, come back down into your fabric at point A.
Point A has now become your point B.
Repeat until you have completed your outline.
While that may sound tricky, you are basically just working the thread into the line in a backwards motion.
For example, you want to make a line across your fabric from left to right. You will always be putting your thread in from right to left. (coming up to the right of the line and coming down on the left-hand side.)
I love the Back Stitch to create outlines of animals and stems for flowers. I find it to be very effective and quite pretty.

3. Split Stitch
The Split Stitch is really fun. It’s a “cheat” way to do a chain stitch (explained below). I like this stitch as a base outline to put under satin stitching. (which I will cover in a future blog post). It looks really nice to create any lines in your embroidery, like flower stems, ribbing in leaves, highlights and outlines between stitches, whatever your heart desires.
Come up at point A.
Go down at point B.
The next time you come up, pull your needle in the middle of your previous stitch and split your stitch in two. This works best if you are using 2 or more threads.
Continue in this fashion until you are happy!

4. French Knots
French Knots are the cutest! I love them so much. I use them a lot to make eyes and stars in my embroidery pieces. You can use them sparsely or cluster them together to create a really lush and textured fill. I did an embroidery of sumac where all the drupes were French Knots. They can be frustrating, though, so be patient with yourself.
A trick to get this to work out well is to hold your knot tight using your non-dominant hand. Creating a bit more thread tension and keeping the knot tight (but not toooooo tight) on your needle will help you get the nice knot texture.
Come up at Point A.
Wrap your thread around the end of your needle once.
Go back down through your point A and pull the thread through to leave you with the knot.
If you want to make big knots, add more threads. I find that 4-6 threads make for really chunky big knots. If you want to make really tiny delicate knots, one or two threads will be perfect.

5. Chain Stitch
While this one looks like Split Stitch, it is very different and is (in my opinion) a lot cleaner than the split stitch.
This stitch is super versatile. I have used this one to fill in large areas. You can backstitch through the center of it with a contrasting colour to make it “pop.” Or you can even off-center your chains so that it creates a zig-zag. There are a lot of variations on this stitch but experiment with it. Because it is a necessary stitch to have in your arsenal and looks gorgeous.
Come up at point A.
Make a loop to your desired length. Hold it in place with your thumb.
Go back down at point A, still holding your loop in place.
Come up at point B, where you want your loop to rest.
Point B holds the loop in place and then turns into your new point A.
Repeat this until you have a nice chain.

6. Couching
This is such a luscious stitch. It really adds such a cool texture to your piece. I feel like this stitch is super extravagant and adds such a nice depth of field to your embroidery. It works well as a filler stitch. For example, if you’re embroidering brick, this is a great way to achieve this effect. Or, if you have a large area you want to fill, it takes way less time to insert a couching stitch than some other stitches.
You can always make variations on your stitches, but for this one, you can leave the main threads loose to make a bigger effect, seen on both sides of the sampler. Or twist them tightly to make it look more like rope, like the middle part of the sampler. I like working this stitch with two different thread colours to see where it is tied down. But that is up to you!
Lay a bundle of threads down. I used 4 x 6 threads on the sampler to make it really nice and big.
Using your different coloured thread, come up at point A. (I used a thinner thread (2) to tie down the red.)
Go down at point B, directly across from point A. These should be almost the same hole.
Move your needle over, and come up at point C.
Go down at point D, which should be very close to point C.
Continue until you have tied down the length of couching threads.
And there you have it! 6 simple stitches to get you started on your embroidery project! I would love to see what you have created using these stitches!
If you have any questions or comments, please message me on Instagram: @sad.ie.art
I would love to talk to you and help you make the best embroidery piece you can.
xox,
Sadie